

Table of Contents
I still cringe a little when I think about my early days in the kitchen. My knives were dull, my cuts were uneven, and my fingers often bore the tiny nicks of my culinary impatience. Chopping vegetables felt like a perilous chore, and preparing a meal always took twice as long as it should have. Professional Knife Skills
Then, I saw a professional chef at work. Her knife was an extension of her hand, moving with fluid grace, turning a pile of carrots into perfectly uniform sticks in seconds. The sound was a rhythmic, confident thwack-thwack-thwack. I wasn’t just watching her cook; I was watching an artist. That’s when I realized that mastering knife skills wasn’t about being fancy; it was about safety, efficiency, and enjoying the process.
It took practice, patience, and a few more nicks, but I eventually learned to chop like a pro. And you can too.
The Foundation: A Sharp Knife is a Safe Knife
Before we even talk about cuts, we need to talk about your blade. This was my biggest revelation. I used to think a dull knife was safer because it wouldn’t cut you as easily. Wrong. A dull knife forces you to apply more pressure, making it more likely to slip and cause a serious injury. A sharp knife glides through food with minimal effort, giving you control.
How I Sharpen My Blades
I’ve tried various sharpening tools over the years, but I always come back to a simple, effective method: a whetstone. It takes a little practice, but it’s worth it.
- Soak the Whetstone: Submerge your whetstone in water for 5-10 minutes until no more bubbles appear.
- Start with the Coarser Side: Place the coarse side (lower grit number) of the stone on a damp cloth to prevent slipping.
- Find the Angle: Hold your knife at a consistent 15-20 degree angle. Imagine slicing a very thin piece off the stone.
- Grind One Side: With consistent pressure, push the blade away from you, then pull it towards you, maintaining that angle. Repeat 10-15 times.
- Flip and Repeat: Flip the knife to the other side and repeat the process for the same number of strokes, focusing on the opposite edge.
- Switch to Finer Side: Once you feel a slight “burr” (a tiny wire edge) on the opposite side of the blade, switch to the finer grit side of the whetstone and repeat the entire process, reducing pressure.
- Honing Steel (Maintenance): After sharpening, and especially before each use, I quickly run my blade along a honing steel a few times. This doesn’t sharpen the knife but realigns the microscopic edge, keeping it sharper for longer.
A sharp knife feels different. It slices paper cleanly, and it effortlessly pushes through a ripe tomato skin. That’s the feeling of safety and readiness.
The Grip: Your Command Center
How you hold your knife is crucial. Forget the “handle only” grip you see in movies. That gives you poor control.
My go-to grip is the “Pinch Grip.” I pinch the base of the blade (where it meets the handle) with my thumb and forefinger, wrapping the rest of my fingers around the handle. This gives me maximum control over the blade’s movement.
The Guide Hand: The “Claw” for Safety
My other hand, the one holding the food, is my protective shield. I curl my fingers into a “claw” shape, tucking my fingertips behind my knuckles. The flat side of the knife blade rests against my knuckles, guiding the cut. As I slice, my knuckles act as a barrier, and my fingertips stay safely tucked away. This is non-negotiable for safety.
Mastering the Cuts: Precision for Flavor and Presentation
Now for the fun part! These three cuts are fundamental in professional kitchens for a reason: they ensure even cooking and beautiful presentation.
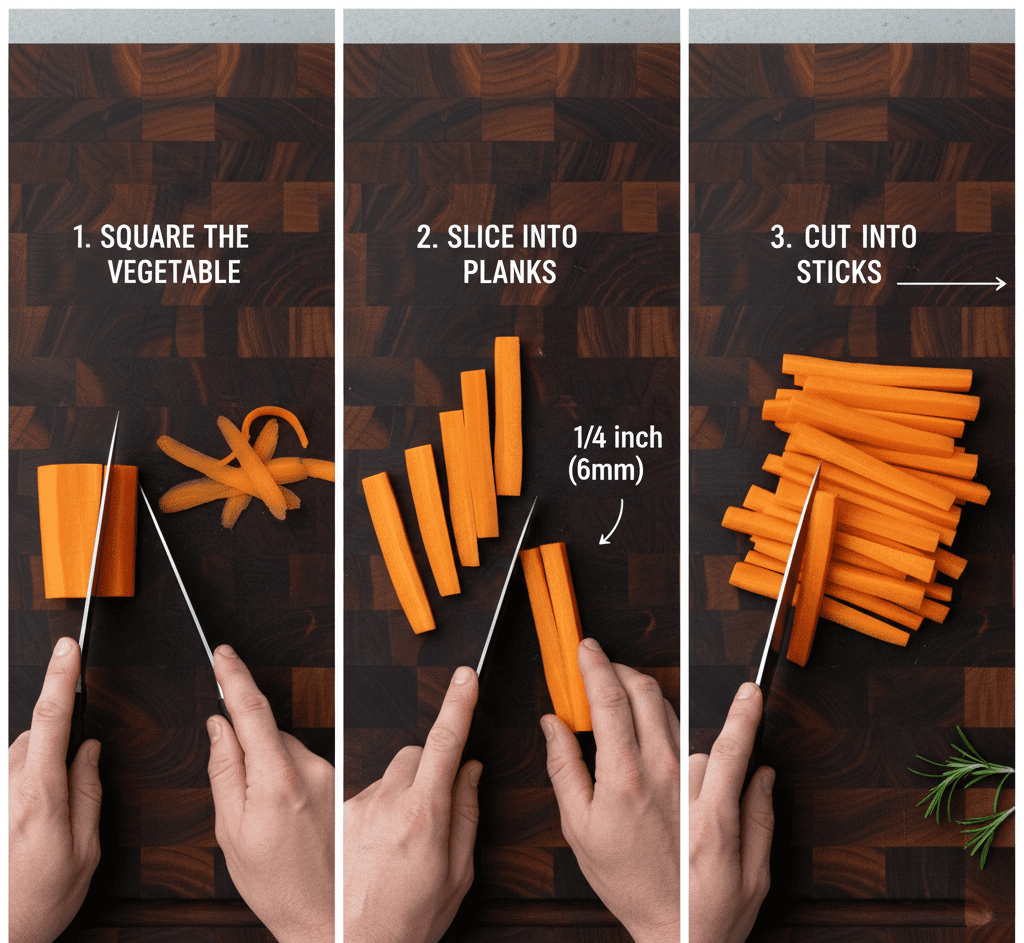
1. The Batonnet (The “Stick” Cut)
This is your starting point for many other cuts. Think of thick-cut fries or sturdy vegetable sticks for dipping.
How I Do It:
- Square the Vegetable: I start by leveling off the ends of my vegetable (like a carrot or potato) and then slicing off a thin section from each side to create a stable, rectangular block. This ensures even cuts.
- Slice into Planks: I then slice the block into uniform planks, usually about 1/4 inch (6mm) thick. Consistency here is key.
- Cut into Sticks: Finally, I stack a few planks and slice them into uniform sticks, again about 1/4 inch (6mm) wide.
- Imagine a crisp, even carrot stick, ready to be roasted or stir-fried.
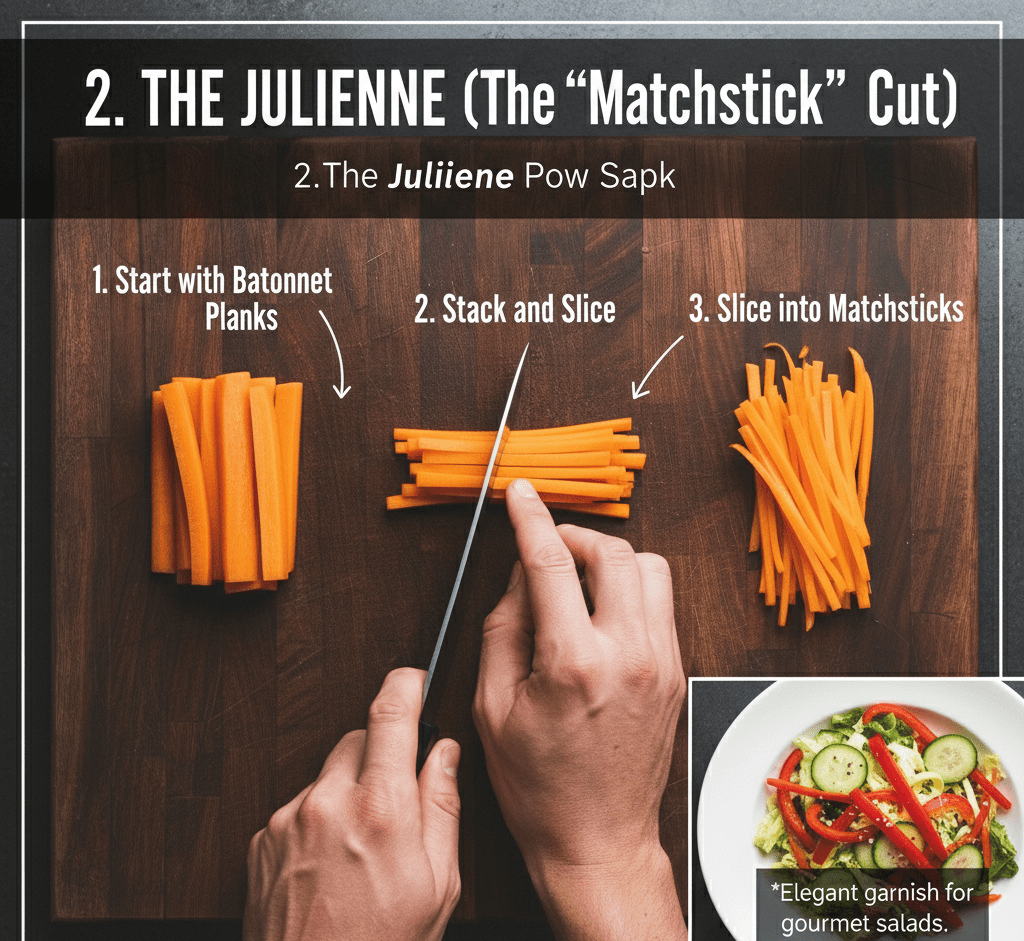
2. The Julienne (The “Matchstick” Cut)
This cut is all about delicate, thin matchsticks. It’s perfect for quick-cooking vegetables, garnishes, or spring rolls.
How I Do It:
- Start with Batonnet Planks: I begin by creating those uniform planks, just as I did for the Batonnet cut. But this time, I aim for slightly thinner planks, around 1/8 inch (3mm) thick.
- Stack and Slice: I stack a few of these thinner planks very carefully.
- Slice into Matchsticks: Then, I slice down through the stacked planks to create very fine, slender matchsticks, also about 1/8 inch (3mm) wide.
- Think of those elegant, thin strips of bell pepper or cucumber you see in gourmet salads.
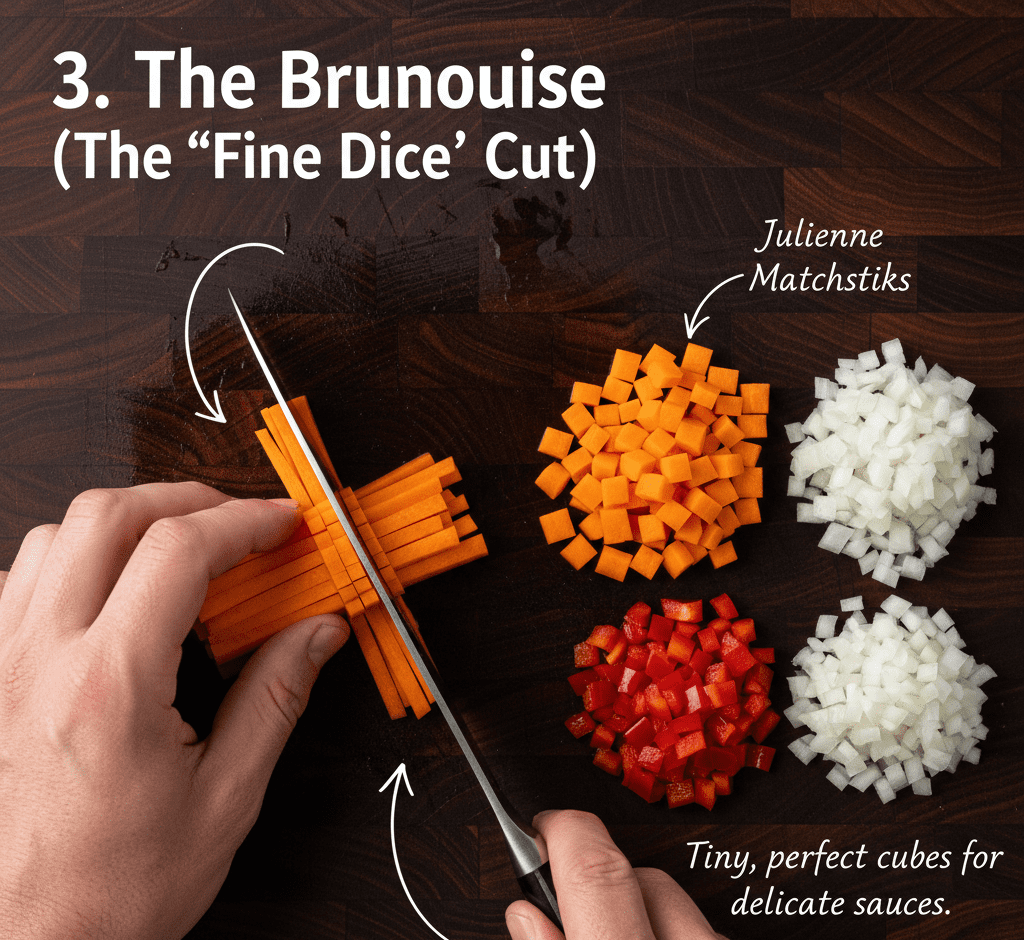
3. The Brunoise (The “Fine Dice” Cut)
The Brunoise is the smallest, most refined dice. It’s derived directly from the Julienne and is ideal for delicate sauces, aromatic bases, or elegant garnishes where tiny, flavorful pieces are desired.
How I Do It:
- Julienne First: I always start by creating perfect Julienne matchsticks. This is non-negotiable. The quality of your Brunoise directly depends on the quality of your Julienne.
- Gather and Dice: I then gather a small bundle of my perfectly cut Julienne sticks and arrange them tightly.
- Slice Across: Keeping them bundled, I slice across the Julienne sticks at even intervals (about 1/8 inch or 3mm) to create tiny, uniform cubes.
- Imagine tiny, perfect cubes of onion or bell pepper melting into a delicate sauce.
My Secret for Consistency: Practice, Practice, Practice
It sounds simple, but the truth is, these skills are built through repetition. I used to buy a bag of potatoes and spend an hour just practicing my cuts, not even intending to cook them all. The muscle memory, the rhythm, the feel of the knife—it all comes with time.
Don’t be discouraged if your first attempts aren’t perfect. Mine certainly weren’t! Focus on safety first, then consistency. The speed will come naturally after that.
Learning proper knife skills didn’t just make me a better cook; it made me a more confident and efficient one. The kitchen became less of a battlefield and more of a creative sanctuary. And it all started with a sharp blade and a willingness to learn the basics.
Are you Team Whetstone (manual sharpening for precision) or Team Pull-Through Sharpener (quick and convenient)?
Share your knife tips, triumphs, or even your comical kitchen mishaps in the comments below!